Manually Reconcile Your Bank Statement
You can reconcile your bank statement after you receive it from your financial institution.
To reconcile a bank statement:
1 In Bank Reconciliation, select Reconciliation Tasks > Reconcile a Bank Statement from the left navigation pane.
2 If the Select Batch window appears, choose an existing batch from the drop-down or click New to create one (see Using Batches in Bank Reconciliation). The Reconcile Bank Statement window will open after you choose a batch.
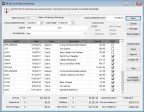
Click thumbnail for larger view of image.
3 In the Bank Account field, type the account name or use the Lookup to enter the account you want to reconcile.
4 Enter the closing amount and statement ending date, and the date you want to cut off activity for this reconciliation.
For detailed information about the options in this window, see BR Reconcile Bank Statement window.
5 Check the type of activity you are reconciling in the Activity Type section of the window.
6 You can select specific items or a range of items to reconcile, and then sort them by selecting an option from the Sort Items By drop-down.
The information presented at the bottom of the window is informational only and reflects the current amount or status of your reconciliation.
7 After you finish entering the reconciliation activity, select Save.
At any point during the reconciliation process, you can view your Bank Register by selecting the Bank Register button in this window (see Working with the Bank Register).
After you reconcile your accounts, you might want to print the reconciliation before you post. We also recommend you review the Edit Report before you post to verify accuracy.
You might also find that you need to clear reconciliation activity, in which case refer to Clear Reconciliation Activity for instructions.
Published date: 05/21/2021