Creating Custom Reports
If you designed custom reports using SAP® Crystal Reports, you can set up Denali to access those reports directly from certain report windows. When you open certain report windows, you can choose to run the default report or choose from your custom reports. You can access custom reports from the following windows:
• Accounts Payable: Aging Report, Print Immediate Checks, Print Checks, Enter Bills Edit Report, Pay Bills Edit Report
• Accounts Receivable: Customer Statements, Aged Analysis, Dated Invoice Payment Report
• Bank Reconciliation: Print Checks
• General Ledger: Audit Trail, Balance Sheet, Budget Performance, Income Statement (Accounting product), Revenue and Expense Report (Fund product)
• Inventory: History Report, On Hand Report, On Order Report
• Payroll: Edit Report, Employee History Report, Employee Leave Report
• Purchase Order: Print Purchase Orders, Reprint Purchase Orders
• Sales: Edit Report, Print Invoices, Reprint Invoices from History, Packing Slips, Picking Report, Profit Margin Report, Sales by Salesperson Report
To attach a custom report to a report window:
1 In Controller, select Organization Options > Define Organization Preferences or Company Options > Define Company Preferences from the navigation pane
2 Select the Custom Options tab in the CMS Module Preferences window.
3 In the Custom Reports grid Report Type drop-down, select the report window you want to access your custom report from.
For more information about the options available in this window, click the Help button.
For more information about the options available in this window, click the Help button.
4 In the Report Location field, enter the path or browse to the path where the custom report file is located.
5 In the Report Name field, enter the name of the report as you want it to appear in the report window.
6 Select the Publish to Server check box if you want to publish the custom report to the SQL server. If this check box is left unchecked, only those with access to the location defined in the Report Location field will be able to run the custom report.
You can right-click in any cell in the grid for options to remove the file from the grid and/or document from the server. You can also choose to download the report if you need to make changes to it.
The order in which you enter custom reports in this window is the order they appear in the report drop-down. You must set up security to add, change, and remove reports from the Custom Options tab.
If you attached a custom report to a report window, you can select the Use a custom report check box and then select the report you want to generate from the drop-down.
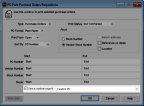
Click thumbnail for a larger view of image.
See the Crystal Reports user documentation for information about how to modify existing Denali reports. You might not be able to make certain modifications. Please call your account representative at (800) 388-3038 for more information.
Published date: 12/14/2021