Activating COM+ Support for Windows Server 2003
If you are using Windows® Server 2003, before you install Denali, you need to set the server to allow COM+. You can do this using the Add/Remove option in the Control Panel.
To allow COM+:
1 In the Control Panel window, select the Add/Remove Programs icon.
2 Select the Add/Remove Components option on the left side of the window.
Click thumbnail for larger view of image.
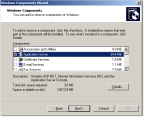
3 In the Components area of the window, highlight the option Application Server and click Details.
Click thumbnail for larger view of image.
4 In the Application Server window, select Enable network COM+ access and click OK.
5 When the Windows Components Wizard window reappears, click Next.
6 Click Finish to complete this process.
Once this process is complete, continue to prepare to set up Denali. See
Managing Administrator Rights and System Security and
Preparing to Connect to the SQL Server for any other system settings you might need.