Adding Stock Item Images
After you create your inventory records, you can add images of your stock items to your system. We recommend that you keep the image file size as small as possible to avoid storing or viewing issues.
You can only add stock item images from the Inventory module.
To add an image of a stock item:
1 In the Inventory module, select Inventory Items > Add / Change Stock Items from the left navigation pane. The IN Stock window opens.
2 Choose the stock item to which you want to add an image.
3 Select the Sales Info tab.
4 Select the Set Image button.

Click thumbnail to view larger image.
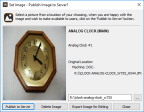
5 In the IN Set Image - Publish Image to Server? window, type the file and path for the image location or use the ellipsis button to browse for the location of the image file. Image files must be in either .jpg, .bmp, or .gif format.

Click thumbnail to view larger image.
6 Click the Publish to Server button to add the image to this stock item.
7 Select Close to return to the Sales Info tab of the IN Stock window.
Published date: 12/21/2020