Creating a New Non-Inventory Item to Use in the Sale
If you need to sell a non-inventory item that isn’t already in the system, you can use one of two methods to create it on the fly while you enter a sale. You can add an item from the Non-Inventory Lookup window or add it from one of the sales entry windows. The instructions here provide both methods and assume you are currently working in one of the sales entry windows.
To use the Lookup to create a new Non-Inventory item on the fly:
1 Press ALT+F1 in the Item field to open the Sales Non-Inventory Lookup window.
2 In the Lookup, click the Add button and complete the information in the Sales Non-Inventory Codes window that appears.
3 Click Save/Select to save it and include it in the current transaction.
To create a new Non-Inventory item on the fly by typing or scanning the item:
1 Scan the item’s bar code or type the item name in the Item field and press TAB. The No Information Detected in System window will open.
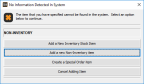
Click thumbnail for larger view of image.
2 Click the Add a new Non-Inventory Item button.
3 Enter the information for the new non-inventory item, then click Save/Select to save it and include it in the current transaction.
Published date: 11/22/2021