ArcBill
ArcBill is a bill management app that integrates with Denali Accounts Payable. Your employees can enter bills and payments through ArcBill and then import the transactions into Denali.
To use ArcBill with Denali, you need to integrate Denali to ArcBill, make sure you have the same vendors in both programs, and export your GL expense accounts into ArcBill. You must have Accounts Payable and General Ledger installed to use ArcBill.
See the ArcBill documentation for instructions on how to use the app.
To integrate Denali and ArcBill:
1 In Accounts Payable, select Options > Set up the Module Preferences from the left navigation pane. The AP Modules Preferences window will open.
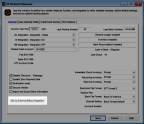
Click thumbnail for larger view of image.
2 Click the Set Up External Billing Integration button at the bottom of the window. The External Billing Setup window will open.
Click thumbnail for larger view of image.
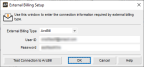
3 From the External Billing Type drop-down, choose ArcBill.
4 Enter the User ID and password you received by email.
5 Click the Test Connection button to make sure your connection is working.
6 Click OK to close the window.
You will now be able to import and export vendors, export your GL expense accounts, and import bills.
To import vendors into Denali:
1 In Accounts Payable, click Vendor Accounts > Import/Export ArcBill from the left navigation pane. The Import/Export ArcBill window will open.
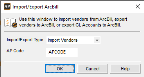
Click thumbnail for larger view of image.
2 From the Import Export Type drop-down, select Import Vendors. The AP Code field will appear.
3 Choose the AP Code you want to attach to the imported vendors. All vendors must have an AP Code. You can edit this Code in the AP Vendors window after you import.
4 Click OK.
All the vendors in ArcBill will be imported into Denali.
To export vendors or GL expense accounts from Denali:
1 In Accounts Payable, click Vendor Accounts > Import/Export ArcBill from the left navigation pane. The Import/Export ArcBill window will open.
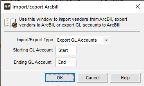
Click thumbnail for larger view of image.
2 From the Import Export Type drop-down, select either Export Vendors or Export GL Accounts.
3 Enter the range of vendors or accounts you want to export.
4 Click OK.
The range of vendors or GL accounts you selected will export to ArcBill. If there are errors, an error report will appear.
To import bills from ArcBill:
1 In Accounts Payable, click Bill Tasks > Import Bills from External Billing from the left navigation pane. The Import Bills from ArcBill window will open.
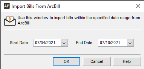
Click thumbnail for larger view of image.
2 In the date fields, enter the start and end dates for the bills you want to import.
3 Click OK.
The bills will import into Denali and you can access them from the Enter Bills window.
To import payments from ArcBill:
1 In Accounts Payable, select Payment Tasks > Pay Bills Automatically from the left navigation pane. The AP Prepare Payments Automatically window will open.
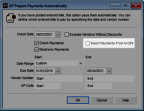
Click thumbnail for larger view of image.
2 Check the Import Payments from ArcBill check box.
3 Enter the date range for payments you want to import. You can also filter by AP Code and vendor.
4 Click OK.
Payments will import into Denali and you can view them in the Adjust/Pay Bills window.
Published date: 10/11/2021