Adjusting a Vendor Balance (Increasing the Vendor Balance)
There might be times when you need to increase your vendor balance. For example, if you recently purchased inventory from a vendor or need to make an adjustment.
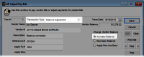
To increase your vendor balance:
1 In Accounts Payable, select Payment Tasks > Adjust / Pay Bills Manually from the left navigation pane. The AP Adjust/Pay Bills window will open.
2 In the Vendor # field, type the vendor whose balance you want to increase or use the Lookup to select them.
3 Select Balance Adjustment from the Transaction Type drop-down and enter the vendor information for this payment.
4 Select the Increase Balance radio button from the Change Vendor Balance section of the window.
Click thumbnail to view larger image.
5 Complete the detail item grid for this payment by entering the GL Account and the amount to be applied.
The GL Account # you enter here is the opposing General Ledger account that will be affected by this transaction, not the liability account.
6 Select the Apply check box if the adjustment should be applied to the specified account.
7 Select Save to save the transaction.
Published date: 12/03/2021