Importing Customer Information
You can conveniently import customer information into Accounts Receivable from an external file.
To make sure you have the proper file format before you begin, view File Formats Supported by Denali for Importing Data. For information on how to verify that your file formats are correct, see Use the Export Feature to View File Formats.
To import customer information:
1 In the Accounts Receivable module, select Resources and Tools > Import Customer Information from the left navigation pane.
The AR Import/Export window appears.
The AR Import/Export window appears.
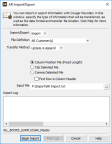
Click thumbnail for larger view of image.
2 From the Import/Export drop-down menu, select Import.
3 Select the type of file, method, and format you will use for this import. For detailed information about any of the options in this window, select the Help button in the software window.
4 Once you enter all the information for this import, select the Begin Import button.
During the import process, data that is importing to the various fields displays in the Import/Export Log text box. This box will also show any errors that occurred during the process. When this process is complete, you will see a message that indicates the transfer was successful.
If an error occurs during the process, you can print the log for reference to correct the errors and then retry the import process. Select the Print Log button to print the error log.
Published date: 12/31/2020