Purging History in General Ledger
When you purge history, it removes unwanted transactions from the history file that have a transaction date older than or including the purge date you specify. You might want to purge to reduce the amount of computer hard disk space occupied by the General Ledger data files or to speed up the processing time when sorting or printing the Audit Trail Report.
If you purge history, we strongly recommend you make a backup before you purge. This way you can restore the purged information from the backup should you need it.
If you have balance forward amounts, do not purge the previous year. If you purge the previous year with balance forwards, you will lose the balance forward amount and if you recalculate, your accounts will be out of balance.
To purge General Ledger history:
1 From the General Ledger navigation pane, select Period End Tasks > Purge Journal History.
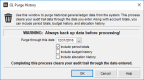
Click thumbnail to view larger image.
Keep in mind that all data through the date you enter is purged and no longer available.
3 If you want to purge account totals, budget history, or allocation history, check the respective check box(es).
4 Select OK to purge history. You must have one check box selected before you can select OK.
Published date: 09/30/2021