Install the Software
These topics will help you through the installation process for Denali. The information assumes you have already reviewed and implemented any necessary requirements for installing Denali. If this is not the case, before you continue, please refer to Before You Begin Installing Denali for more information. While Cougar Mountain strives to help ensure the highest level of security available within the software, it is still necessary to properly set your system security on all server and workstation (client) machines after installation.
To install Denali:
1 Insert the Denali flash drive into a USB port or, if you downloaded the program, mount the .iso on a virtual drive. If you are setting up a server on a separate machine, you need to complete the installation on the server machine first.
2 Access the flash drive and double-click the .iso file. Or, if you downloaded Denali, access the virtual drive on your computer and unzip the Denali ZIP file. From there, you can double-click the .iso file. The main installation window appears; click on any of the options to get information about Denali before you begin the installation process.
• Release Notes: Select this option to review any last-minute information about this release of Denali.
• Installation Guides: Select one of the options listed below this heading to open the installation guide for your installation type. The guides are in PDF format and are specific to each type of installation supported by Denali. There is also help available in each installation window that you can access by selecting the Help button or pressing F1 on your keyboard.
• eDelivery: Select this to access information about eDelivery, which allows you to email invoices, statements, purchase orders, and pay stubs.
• Denali BI: Select this for information about Denali BI, our Business Intelligence platform.
• System Requirements: Select this option to view the Denali system requirements before you start the installation.
• Training: Select this option to learn more about your training and education options available through Cougar Mountain.
• Customer Support: Select this to access information about contacting Cougar Mountain Customer Support.
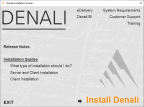
Click thumbnail for larger view of image.
3 Click Install Denali to begin the installation process. Once you click this, the system will automatically search for the following components:
• .NET Framework 4.8
• Windows® Installer
• Microsoft® Database Access Component (MDAC)
If .NET Framework 4.8 is not installed, you will need to install it. You can access the .NET installation file from the Software Installations section of the Customer Service site. If the Windows Installer or the MDAC components are not installed, or if they are not the latest versions necessary for running Denali, the system will install them for you. This process could take a few minutes. If the system installs or updates these components, you might be prompted to restart the computer.
4 After the system confirms that all components are installed, the InstallShield Wizard appears and you can continue with the installation by following the on-screen instructions.
If you need additional help, or if you encounter problems during the installation process, refer to Troubleshooting and Available Help Resources.
Published date: 10/12/2020