Connecting to the Server
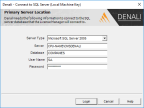
In this window enter the information to connect to your server. This information is the computer name (see Preparing to Connect to the SQL Server) plus the instance name and password previously entered in the installation (see Installing Denali Components for more information). The installation defaults appear in this window, but if you need to modify them, be sure to enter the computer name and instance name using a forward slash as a separator, so it would look something like this: <CPUNAME>\CMSDENALI.
Click thumbnail for larger view of image.
Once you enter the information in this window and click Login, the system will save the settings to the registry (if this option is selected) and validate the connection to the database server. If this connection is successful, the next window will appear.
If the connection is unsuccessful, a message box will appear that indicates the problem. For reference, you can print the error information by clicking the Print button. See Problems with the Installation? for additional assistance.
Server Type
This field shows the SQL server version you are connecting to.
Server
In this field you need to enter the server name you want to connect to from this machine. If you are installing Denali on the server machine, then the server name is the same as the machine you are on. If you are installing Denali on a workstation (client) machine, the server name is the machine you will be connecting to.
Database
The information in this field is read-only and the default for your database is COMPANIES.
User Name and Password
The User Name was already defined as sa during the SQL installation with a default password of Password33!. If you changed this password and no longer have this information, see Problems with the Installation?.
Time Out
You can specify a length of time the system should wait for information from the server before returning a message that the request timed out. This setting is used each time a request is made from a workstation to the server.
Write to Registry
If you select the Write to registry if successful check box, the information in this window will be written to your computer’s registry. In this case the information in this window will not be required when you launch Denali. If you leave the check box unchecked, this information will be required each time you launch Denali.
Published date: 10/12/2020