Setting Up Denali After the Import
To finish your new organization setup process, Denali guides you through a few windows in the Controller module.
If you have questions about any of these windows, you can access help from within Denali by clicking the Help button in the software windows or selecting Help > Contents from the menu bar. We also offer web help, which you can access at https://cougarmtnservice.com/help, and PDFs, which you can access from the Documentation section of the Customer Service Center at https://cougarmtnservice.com/documentation. You can also contact Customer Support at (800) 390-7053.
Follow these steps to complete your organization setup:
1 In the CMS Organization Information window, enter your general information on the Organization Detail tab.
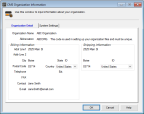
Click thumbnail for larger view of image.
2 Select OK.
After your organization is created in the database, the CMS Install Modules window will appear.
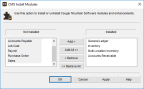
Click thumbnail for larger view of image.
3 Any modules for which you imported data from QuickBooks will be in the Installed column. Add any other modules you want to install and select OK.
After the selected modules are installed, the CMS Fiscal Calendar window will open.
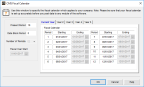
Click thumbnail for larger view of image.
4 Set up the fiscal calendar to best meet the needs of your organization.
The fiscal calendar affects how your transactions post and it can be difficult to change the calendar after you’ve posted.
5 Select OK.
You can now access all of your installed modules. See Minimum Setup for Each Module for a list of the minimum setup you must compete for each module before you can begin using Denali.
Published date: 12/08/2021