Setting Up Your Registers
You must set up your registers with Register Codes before you can use them. Register Codes control activity at the register and sometimes work in conjunction with other codes. Register Codes are commonly used because they can:
• restrict activity for a register by attaching a Salesperson Code to it.
• help keep track of receipts and disbursements of cash, credit cards, and checks, and keep a running total for each. Register Codes require that the cash drawer is balanced with these totals before you post the transactions.
• direct General Ledger posting for cash receipts, payments on account, and overages or shortages.
• direct invoice or receipt output to the appropriate printer and designate the format to use with Format Codes. For information on setting up the format of your invoices or receipts, see Setting Up Invoice and Receipt Formats.
Register Codes work in conjunction with Device Codes to establish communication between the register and the other hardware devices in the Point of Sale system. When you develop your naming scheme, consider how you will use the codes. For example, if you have multiple shifts and you want to have one Register Code per terminal per shift to help track sales you could use codes such as RG3-AM, RG3-MD, and RG3-PM. These codes indicate register number 3 for the morning shift, the mid shift, and the evening shift.
To set up your Register Codes:
1 In the Sales module, select Hardware and Formats > Set Up the Registers from the left navigation pane.
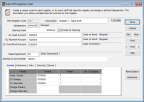
Click thumbnail for larger view of image.
2 Enter a unique code of up to six letters, numbers, and/or special characters. This code is used to identify a particular register when you enter sales and appears in the Lookup.
3 Enter a description to help distinguish this register from the others, usually the register’s location name or physical location.
4 Enter a default Salesperson Code, Sales Tax Code, and Sales Department. We suggest you assign a default Salesperson Code for all registers. Impose all limits on the Salesperson Code so the register is not without controls when no salesperson is logged in. See Setting Up Your Salespeople (Salesperson Codes) for information on setting up these codes.
5 On the Hardware tab, set up any peripheral devices you want to attach to the register, such as a barcode reader or weight scale.
6 On the Misc. tab, you can select the sales layout you want to use, set the terminal number for credit card authorization, and select if you want the register to be in scanner mode.
7 On the Security tab, define security for this register, including logging on/off and locking the register.
8 On the Genius tab, you can enter a unique terminal ID to meet MasterCard requirements and assign a Genius device to this Register Code.
For detailed information about the options in this window, see Sales Register Codes window.
Published date: 11/22/2021