Setting Up Invoice and Receipt Formats
You can set up different invoice and/or receipt formats based on your business needs. They can be customized for the customer’s payment method and they can also be set up to include special messages, such as information about upcoming special events or promotions. You can set up different receipts/invoices for certain transaction types and to print to different printers.
The Sales module includes six Order Entry invoice formats, numbered OE0001 through OE0006 and six Point of Sale receipt formats, numbered POS001 through POS006. These are full-page laser formats and you need Crystal Reports® to edit them (see Designing Denali Reports for information about Crystal Reports). If you need help setting up additional formats, contact Cougar Mountain’s Customer Support Department at (800) 390-7053.
NOTE: You can preview the available formats by selecting the Print Preview button. If you select an included Denali format to edit, a message window appears that indicates whether or not you have Crystal Reports installed. If you do, select the message window option to open Crystal Reports and modify the format. If you don’t have Crystal Reports installed, you need to install it before you can modify these formats. For specific information about how to modify formats, refer to your Crystal Reports documentation. |
You can create as many formats as you need.
To create or edit receipt and invoice formats:
1 In the Sales module, select Hardware and Formats > Sales Format Codes from the left navigation pane.
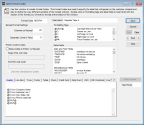
Click thumbnail for larger view of image.
2 To create a new format, enter a Code up to six characters in the Format Code field. Or, to edit an existing format, type the format name or select it from the Lookup.
3 Click Edit to modify the format.
If you select an included Denali format, you need Crystal Reports to edit it. A message will appear indicating whether or not you have Crystal Reports installed.
4 Make any necessary changes to the general settings.
5 Select the tab that identifies the section of the receipt you want to change, such as the Header or Footer tab.
6 Place your cursor in the exact location where you want the formatting tag or field information to appear and double-click an option in the Formatting Tags or Data Fields group to add your change to the receipt/invoice.
7 Select the Print Preview button to view your format changes.
The preview window shows how the individual parts of a receipt will appear. Credit card rebate information will not appear in the preview.
8 If the format is acceptable, select the Finished button and then click Save in the Sales Format Codes window.
To specify the default invoice formats to use when you print invoices from the Sales Order Entry window, open the OE Invoices tab of the Sales Set Up Sales Entry Layout window. To specify which format to use when you print Order Entry invoices from the Reporting menu, open the Defaults tab of the Sales Order Entry Preferences window.
To specify which formats to use when you print Point of Sale receipts, open the Receipt tab of the Sales POS Register Codes window (see Setting Up Your Registers).
Published date: 11/22/2021