Report Manager
If you have custom reports for any of your companies, you can publish your updated reports to the server using the CMS Denali Report Manager window. You can set certain options in the Options window.
To publish reports to the server:
1 From the Denali Utilities menu, select Report Manager.
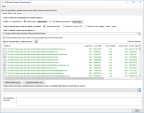
Click thumbnail for a larger view of image.
2 Select the Default value @@@@@@ radio button to replace the report for all companies or select the User-defined company radio button to add the report to the database for only a specific company.
3 Choose the radio button for the file type you want to publish.
4 Browse to the directory that contains the report you want to publish.
Select the Include subdirectories check box if you want to include subfolders of the folder you browsed to.
5 Select the Sprocket button to load the files into the list box.
6 Once the files appear in the list box, select the check boxes for the files you want to upload. You can also use the buttons below the list box to check or uncheck all files in the list.
7 When you are ready to publish the selected files to the server, select the Server button next to the status bar.
CAUTION: If you have multiple files with the same name, only one will be published to the server. Multiple copies of the same file will not appear in the database. Be sure to use different names for files you want to publish to the server. |
The status bar indicates the process is working. After the process is complete, you can view a list of files that were published in the Files published to server: box.
Published date: 08/28/2020