Printing Checks
Once you enter and edit all of your transactions, you are ready to print checks.
To print checks:
1 In Accounts Payable, select Payment Tasks > Print Checks from the left navigation pane.
If you use batch processing, select an active batch.
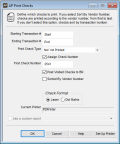
The AP Print Checks window will open.
Click thumbnail to view larger image.
2 Select the range of transaction numbers and the types of checks you want to print.
3 If you would like the system to automatically assign the check number, select the Assign Check Number check box and enter the first check number.
4 When you print a check for a payment that has more detail lines than will fit on a single check stub, an additional check is printed to accommodate the extra detail lines. The first check is then voided, and the second check is printed for the entire payment amount.
To avoid leaving blank check numbers in your bank register as a result of the voided check, select the Post Voided Checks to BR check box. This check box is only available if Accounts Payable is integrated to Bank Reconciliation, and the Assign Check Number check box is selected.
5 Enter any remaining information and select OK.
If you defined a custom report for this window in Controller, you can select the Use a custom report check box and then choose the custom report you want to run from the drop-down.
You can use Crystal Reports® to add fields to the check. Refer to your Crystal Reports documentation for instructions.
Published date: 12/03/2021