Automatically Back Up Data
If you want to back up your data on a regular basis, for example, nightly, you can use the Microsoft® Task Scheduler to set up automatic backups for any organization or all your organizations. You can also manually back up your data at any time.
To set up automatic backups:
1 Click Start > Control Panel > System and Security > Administrative Tools.
2 Double-click Task Scheduler.
Click thumbnail for larger view of image.
3 In the Task Scheduler window, select Task Scheduler Library in the left navigation pane.
4 Right-click on Task Scheduler Library and select New Folder from the menu.
5 Enter a folder name, for example Denali Backups and click OK.
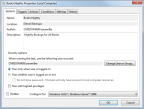
6 Highlight the folder you created and click Create Task in the Actions box on the right.
7 In the Create Task window, enter a task name and description. For example, Books Nightly and Nightly Backups for All Books.
8 Select the Run only when user is logged in radio button.
Press F1 on your keyboard to view the Microsoft help for more information about the options in this window.
Click thumbnail for larger view of image.
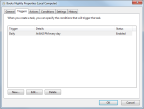
When you set up a backup task, you must specify the conditions to trigger the backup. Use the Triggers tab to do this.
To set up the Triggers tab:
1 In the Create Task window, click the Triggers tab.
2 Click the New... button.
3 In the New Trigger window, set the frequency and time you want the backups to occur. For example, you can choose to back up your data daily at 8:00 pm.
4 Check the Enabled check box at the bottom of the window.
Click thumbnail for larger view of image.
5 Click OK.
The next step when you create a backup task is to specify what should get backed up and where it should be saved. Use the Actions tab for this.
To set up the Actions tab:
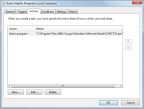
1 In the Create Task window, click the Actions tab.
2 Click the New... button.
3 In the New Action window, select Start a program from the Action drop-down.
4 In the Program/script: field, enter the path to your Denali software. For example, C:\Program Files (x86)\Cougar Mountain Software\Denali\CMSCT32.exe.
5 In the Add arguments (optional) field, enter -dc <company code> -cu <login> -qt -bk <location to store backup>. For example, -dc ALLBOO -cu SUP -qt -bk C:\DataBackup\.
• -dc indicates which company to back up
• -cu indicates which user to log in with. This user should not have a password and you should only use it for this function.
• -qt indicates that the process should run in the background (i.e. you won’t see Controller open)
• -bk indicates to start a backup. If you enter a path after this, it will store the backup in the designated location. The backup will be overwritten each time.
NOTE: If you use iVault to back up your data, be sure to set your Denali backup to a folder that iVault will copy. |
If you do not enter a location after -bk to store the data, it will default to the location of your manual backup and a new file will be created for each backup. If you do enter a location, the backup will be overwritten each time.
6 In the Start in (optional) field, type the path where your Denali CMSCT32.exe file is located. For example, C:\Program Files (x86)\Cougar Mountain Software\Denali\.
Click thumbnail for larger view of image.
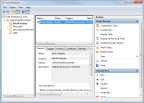
7 Click OK to save.
The other settings for this task can be left as the default settings or you can change them to meet your needs. Press F1 on your keyboard to view the Microsoft help for more information about the options in this window.
8 Click OK in the Create Task window to save this task.
Click thumbnail for larger view of image.
When the backup is finished at the set time, a CAB file will be at the path you specified. For example, C:\DataBackup. You can restore this data any time.
Published date: 12/14/2021