Adding Promotional Codes
You can quickly designate how and when your stock items will sell for special discounted prices. If you do not have Specialty Shop installed, some tabs, columns, or boxes might appear differently than illustrated here. For example, the Buy 1 Get 1 tab is not available unless Specialty Shop is installed.
To establish the details of the Promotional Pricing Code and to include stock items in the promotion:
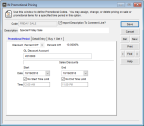
1 In the Inventory module, select Options > Set Up Promotional Pricing from the left navigation pane. The Promotional Pricing window will open.

Click thumbnail to view larger image.
2 Enter a Promotional Pricing Code, up to 20 characters, in the Code box.
3 Enter the description for this Promotional Pricing Code, up to 50 characters in length.
4 Select the Import Description To Comment Line? check box to show the description for this Promotional Pricing Code on invoices or receipts when it is used in a Sales transaction. Leave this check box unchecked if you do not want to show the description.
5 On the Promotional Period tab, select the type of discount to use for this Promotional Pricing Code.
For detailed information on the options in this window, see IN Promotional Pricing window.
6 If Inventory is integrated to General Ledger, enter the GL Discount account to use for posting promotional pricing discounts.
7 Enter the starting and ending date and time of the sale or promotion. You can enter times in 24-hour or standard time. Standard time automatically sets the A.M. or P.M. times (type A for A.M and P for P.M.). If you use a 24-hour clock, be sure to use a zero before numbers under 10 (e.g., 0900 for 9:00 A.M.).
8 On the Detail Entry tab, add a range of stock items and select the Add to Grid button.
All stock numbers within the specified range are added to the grid. You can also add each stock item individually by entering the stock number in the Stock Item column. If you selected Fixed Price as the discount type on the Promotional Period tab, enter a fixed dollar amount for each stock item.
To print promotional shelf signs, see Printing Promotional Shelf Signs.
9 If Specialty Shop is installed, use the Buy 1 Get 1 tab to specify any Buy x Get x discounts and associated stock items to include in this promotion. Refer to Promotional Pricing for Buy 1, Get 1 Sales for more information on setting up Buy 1 Get 1 discounts.
10 Click Save.
If you want to edit or delete this code, see Changing or Deleting Codes.
Published date: 12/21/2020