Importing Inventory Data
Inventory allows you to import or export certain data between Denali and an external file. For instance, if you have an external spreadsheet that contains new stock items, quantities, and prices, you can import this information directly into Denali instead of individually creating each new stock item record. Depending on your choices, this feature will add or update specific information directly in your inventory tables, and you won’t need to post adjustment transactions.
If you need to import adjustment transactions from an external file, see Importing Adjustment Transactions into Denali.
Before you import data, make sure the text file is in the proper format and all required fields have entries.
You can also use the export feature to see how the file should be formatted before you import it.
To import stock item information:
1 In the Inventory module, select Inventory Items > Import / Export Stock Information from the left navigation pane. The IN Import/Export window appears.
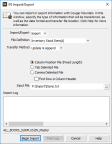
Click thumbnail to view larger image.
2 From the Import/Export drop-down, select Import.
3 Select the type of file, method, and format you will use for this import. For detailed information on the options in this window, see IN Import/Export window.
4 Once you enter all the information for this import, select the Begin Import button.
During the import process, data that is being imported to the fields will display in the Import/Export Log text box. This box will also show any errors that occur during the process as well as a message that indicates the transfer was successful.
If an error occurs during the process, you can print this log for reference to correct the errors, and then retry the import process. Select the Print Log button, to print the error log. For information on correcting errors in an external file, see Correcting Adjustment Transaction Errors.
Published date: 12/21/2020