Importing Inventory Transactions from Hand-Held Scanner
Once you capture the data on the hand-held scanner you need to import it into Denali and generate the transactions to adjust the inventory quantities.
To import the ASCII inventory data and generate adjustment transactions:
1 In the Inventory module, select Adjustment Tasks > Import Adjustments from a Hand-Held Scanner.
2 If you use batch processing, select an empty batch or create a new one (see Working with Transaction Batches in Inventory).

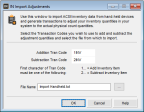
Click thumbnail to view larger image.
3 Select the Transaction Codes you want to use to add and subtract the adjustment quantities.
For additional information, see Setting Up Transaction Codes.
4 In the File Name box, enter the path and file name of data file you want to import, or use the ellipsis button to browse for the file.
5 Select OK.
During the import process, the system combines quantities for identical stock numbers to create one adjustment transaction for each stock number. The process continues until all of the transactions are imported.
If the item number is an alias (see Setting Up Additional Stock Item Identifiers), the related stock number adjusts automatically. If neither the stock item nor the alias are found in the master table, an Import Error Report automatically generates.
When the system imports transactions, it checks each piece of information to make sure it is in an acceptable format, required fields are not empty, and so on. If there are any errors, you will need to correct them before you post. Use the Import Error Report or Edit Report to determine and correct any errors (see Determining and Correcting Errors in Imported Transactions Before Posting or Printing the Inventory Edit Report).
NOTE: Certain information is required to post, such as dates. However, the same information is not necessary to import transactions. Be sure to print an Edit Report and review it carefully before you post your imported transactions. |
After you enter all of your on hand adjustments, run the Shrinkage Report to see the difference between your original and adjusted quantities.
Once all of the transactions are verified and any errors corrected, you can then post.
Published date: 12/21/2020