Importing QuickBooks® Data Into Denali
After you export your QuickBooks data and make sure it meets the Denali import requirements, you can begin the import process.
To import your QuickBooks data into Denali:
1 Now that you are logged into a Denali organization, select Company Options > Define Company Information from the left navigation pane. (If you use Fund accounting you will see Organization instead of Company.)
The Set Up/Select Organization window will open.

Click thumbnail for larger view of image.
2 In the Set Up/Select Organization window, click New.
The CMS Select Accounting Type window appears.
3 From the radio buttons in the CMS Select Accounting Type window choose if you want to create a Fund or Non-Fund organization type.
After you select OK, the Create Denali Organization window appears.

Click thumbnail for larger view of image.
4 In the Create Denali Organization window, select the Import from QuickBooks® radio button.
5 Select OK.
The Import Files from QuickBooks window will open. This will import your master files, such as ledger accounts, customers, and vendors.

Click thumbnail for larger view of image.
6 For each Excel file you want to import, click the browse button to the right of the field and navigate to the folder where the QuickBooks export file is stored.
7 After you select all the QuickBooks files you want to import, select OK.
If there are any errors in your import file, a report will appear showing you what the errors are. You will need to correct these errors before you can continue with the Denali import.
This report might also show you warnings. These are issues that Denali will import and you can choose to address them either in your import file or once the data is in Denali.
After you address any issues in the error report, the Account Segment Setup window (Fund product only) or the Import Transactional History Files from QuickBooks® window (Accounting product only) will open.
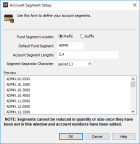
Click thumbnail for larger view of image.
8 Enter your fund setup information, including the fund segment name, segment location, and segment lengths, and click OK.
After you address any issues in the error report, the Import Transactional History Files from Quickbooks® window opens.
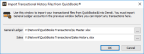
Click thumbnail for larger view of image.
9 If you want to import transaction history files for General Ledger or Sales, click the browse button to the right of the field and navigate to the folder where the QuickBooks export file is stored.
To import these transaction history files, you must have imported General Ledger accounts in the previous window. If you want to import Sales transactions, you must also import General Ledger transactions.
10 Click OK to import the data.
If there are any errors in your import file, a report will appear showing you what the errors are. You will need to correct these errors before you can continue with the Denali import.
This report might also show you warnings. These are issues that Denali will import and you can choose to address them either in your import file or once the data is in Denali.
For information about setting up Denali after the import is complete, see Setting Up Denali After the Import.
Published date: 12/08/2021