Check Franker Device
If you use a check franker, depending on the connection type you choose, you might see a few different options in the Connection Settings section of the Sales Device Codes window. You might also notice that several additional fields appear in the Device Settings section of the window.
To define the settings for your check franker:
1 In the Sales Device Codes window, enter a code up to six characters and a meaningful description for this device.
2 Select Check Franker from the Device Type drop-down list.
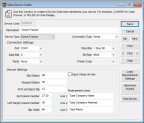
Click thumbnail for larger view of image.
3 Specify the type of connection to the system in the Connection Type drop-down list.
For specific information on the options available in this window, see Sales Device Codes window.
4 Refer to the documentation from your hardware device to determine the settings for the Connection Settings and Device Settings sections of the window.
5 Enter the information you want to appear on the checks in the Endorsement Lines boxes.
6 Click the Test Device button to test the settings for this device. When the test is complete, follow the instructions in the message window to complete the setup.
7 Once the settings are finalized, save this code. Refer to the documentation that accompanied your device to configure the equipment.
Published date: 11/22/2021