Setting Up 3dCart Integration
If you use 3dCart as your e-commerce solution, you need to set up integration to it in Denali.
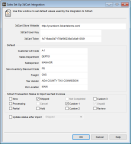
To set up integration to 3dCart:
1 In Sales, select Options > Set Up 3dCart Integration from the left navigation pane.
Click thumbnail for larger view of image.
2 Enter the URL of your 3dCart storefront in the 3dCart Store Website field.
3 In the 3dCart Token field, enter the token you received from Cougar Mountain. You will receive your unique token after you set up Denali in the 3dCart REST API settings and contact our Operations department.
4 In the Default group box, enter the Denali Codes you want to use for transactions you import. If integration is on, you can use the Lookup to select the Codes. These codes are required.
You cannot change the codes when you import transactions.
5 If you use Multi-Location Inventory, enter the location from which you want to sell stock items. You must enter a location and you can only use one location with 3dCart.
6 In the 3dCart Transaction Status to Import as Paid Invoices group box, select the check boxes for the order statuses you want to import from 3dCart. You must select at least one check box to import orders.
You should only import orders that are ready to post. The disabled check boxes represent 3dCart statuses that are not ready to post and are therefore not available to import into Denali.
You should only import orders that are ready to post. The disabled check boxes represent 3dCart statuses that are not ready to post and are therefore not available to import into Denali.
7 If you want Denali to change the status of orders in 3dCart when you import them, select the Update status after import check box and from the drop-down, select the status you want to update the orders to.
For more information about 3dCart, see the Services and Companion Products guide.
Published date: 11/22/2021