Importing Expenses
You can only import expenses after you connect with Expensify. Only approved expense reports can be imported.
To import transactions from Expensify:
1 Select Bill Tasks > Import Bills from Expensify from the left navigation pane and select the batch you want to import transactions into; it does not need to be an empty batch.
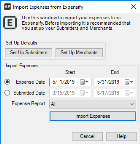
The Import Expenses from Expensify window will open.

Click thumbnail for larger view of image.
3 In the Import Expenses section of the window, select if you want to import based on Expense Date or Submitted Date and enter the date range you want to import.
Nothing that has been previously imported will import.
4 From the Expense Report drop-down, choose a single expense report to import or choose All to import all reports.
5 Click the Import Expenses button. The Import Expenses window will open with all the expenses available for import.

Click thumbnail for larger view of image.
6 If there are any expenses you do not want to import, click the Exclude check box for that row.
7 If you need to add or change the default vendor (fields with missing or invalid vendors will appear red), you can use the Lookup in the Denali Vendor field. This field cannot be blank.
8 If you need to add or change the GL Account (fields with missing or invalid accounts will appear red), you can use the Lookup in the Denali GL Account field. This field cannot be blank.
9 Click the Generate Transactions button.
NOTE: You can assign GL accounts through Categories and Tags in Expensify so expenses will default to a GL account in Denali. Use the Expensify documentation for information on how to set this up. |
Transactions are grouped by vendor and expense date. Expenses that share a vendor and expense date will become one direct expense detail line on your bill.
You can edit individual transactions in the AP Enter Bills window, but because expenses are combined it will be difficult to change certain details.
After you review the Edit Report for transactions in the batch, post the expenses.
Published date: 10/11/2021