Create Stock Items in Your New Location
One way to add stock items to a location is to manually create them in the system. There are also other ways you can add stock items (see Copying Stock Items to Another Company, Transfer Stock Items from One Location to Another, or Importing Stock Items from Another Software). If you prefer to add them directly to the new location, follow the instructions in this section.
To create stock items in a new location:
1 In Inventory, select Inventory Items > Add / Change Stock Items from the left navigation pane.
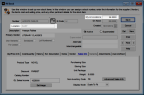
Click thumbnail to view larger image.
2 Enter the stock number of an item you want to add to a new location. This might be a stock item already at the default location.
3 In the Location field, enter a stock location or use the Lookup to select from a list of available locations.
4 Select an Inventory Code to use with this stock item for this location.
The quantity at all locations is recorded automatically in the upper right corner of the window. At this point, you can specify different prices and Min/Max quantities for the stock item in this specific location.
6 Select Save to add the stock item to the new location.
Published date: 12/21/2020