Entering Invoices in Order Entry
When you create Job Cost invoices, the Sales Order Entry window open with fields specific to Job Cost. The entry window layout is defined in the Sales Set Up Layout window and permissions are defined by salesperson rights. Although the invoices are entered in Sales, you post them in Job Cost.
To invoice a job:
1 In Job Cost, select Invoicing/Make to Order > Enter Customer Invoices in OE from the left navigation pane.
2 If you use multi-batch mode and are not already in a batch, the Sales Select Order Entry Batch window appears. Choose the batch you want to use or create a new one.
3 In the Sales Order Entry Login window, select a salesperson from the drop-down, enter the password, and log in. The Sales Order Entry window will open.
4 Click the New Invoice button at the top of the window.
If you want to edit a saved invoice, click the magnifying glass button and choose the invoice from the Lookup.
5 In the JC Invoicing window, select the job you want to invoice and how you want to invoice it.
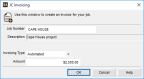
Click thumbnail for larger view of image
6 In the Detail Information grid, make any necessary changes to the invoice.
If you enter a quantity that is less than the total quantity available and you entered activity at different costs for the same Cost Codes, WIP will be relieved in the order of oldest first.
If you want to change the order of the detail lines, use the JC Change Job Detail Order window.
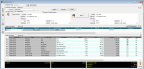
Click thumbnail for larger view of image
7 Click the Tender button to record a customer payment.
NOTE: All invoice payments other than AR Charges post to the GL Cash Account you set up on the Defaults tab of the Order Entry Module Preferences window. AR Charge payments post to the account set up on the AR Code attached to the customer. |
Published date: 03/27/2020