Setting Up Batches
If you are using multi-batch mode, you can set up as many batches as necessary to meet the needs of your business (see Transaction Batches). By considering all the ways you might use batches, you can determine an effective naming scheme. For example, you might include the clerk’s initials, the day of the week, and the date in the batch name for future reference. Keep in mind that when you post a batch, the batch will clear and become unavailable.
To set up a new receiving or purchasing batch:
1 In Purchase Order, select Receiving Tasks > Set Up a New Receiving Batch from the navigation pane or the New button in the PO Select Receiving Batch window
- or -
(Fund product only) In Purchase Order, select Purchasing Tasks > Set Up a New Purchasing Batch from the navigation pane or the New button in the PO Select Purchasing Batch window.
The PO Set Up Batch window will open.
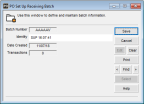
Click thumbnail for larger view of image.
2 Enter a unique identity for this new batch, or accept the default that includes the user name and time the batch was created. The identity you set up will not appear on any reports.
The information for the batch number, the date the batch was created, and the number of transactions is autogenerated by the system and cannot be edited.
3 Select Save to keep this new batch.
When you post activity using this batch, the autogenerated batch information shown in certain reports includes the module from which the activity is generated, the activity number, and the batch number. For example, the posting reference for the batch shown in the image in this topic would appear something like PO000004565AAAAAA on the posting reports.
Published date: 02/08/2021