Setting Up Stock Item Buttons for the Register Window
If you have a touch screen monitor, you can set up stock item buttons to appear in your Register window that you can tap to add an item to a sale. To set up stock item buttons, you must select an option other than Off from the Display Inventory Item Buttons drop-down in the Sales Set Up Sales Entry Layout window.
Although these buttons are designed for a touch screen, you can also mouse-click them.
To set up inventory item buttons for the Register window:
1 In the Sales module, select Options > Set Up Item Buttons from the left navigation pane.
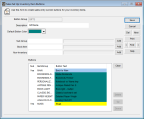
Click thumbnail for larger view of image.
2 If you want to set up your top-level item group, leave the default group of MAIN in view. If you want to set up a different item group, select the New button.
3 To set up a new item group, enter a button group name up to 20 characters and a description to help identify the group.
4 To add a subgroup to this item group, use the Lookup in the Sub Group field or type the subgroup and click Add.
If you type in a subgroup name that doesn’t exist, you’ll receive a message that asks if you want to create a new group. If you select Yes, the subgroup will be added to this item group and you can define the items in that group another time.
If you type in a subgroup name that doesn’t exist, you’ll receive a message that asks if you want to create a new group. If you select Yes, the subgroup will be added to this item group and you can define the items in that group another time.
Tips & Tricks: Adding a Back to Main Button to Each Subgroup |
|---|
In the Sales Set Up Sales Entry Layout window, you can choose to return to the top-level (MAIN) item group each time you add an item from a subgroup to a sale in the Register window or you can choose to remain in the current subgroup. If you choose to remain in the current subgroup, you can set up a Back to Main button to have access to the MAIN item group from all your subgroups. To do this, add MAIN as a subgroup to each item group. If your items appear across multiple panes in the Register window, you can include the Back to Main button in each pane of items by adding MAIN as a subgroup multiple times and using the Up and Down buttons to put each Back to Main button in the spot you want it. |
5 Depending on if this is a stock or non-inventory item, use the Lookup or type the item number in the Stock Item or Non-Inventory field, and click Add.
6 In the Buttons list box, you can move stock items up and down to change the order they appear in the Register window, and you can delete individual stock items or clear the entire list.
7 Select Save when all your stock items and subgroups are added to this item group and they are in the order you want them to appear in the Register window.
Published date: 11/22/2021