Adding Sales Department Codes
Once you decide how you want to use Sales Department Codes and how many you need, you are ready to create them. If you decide later that you need additional codes, you can always add them at that time.
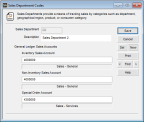
To create your Sales Department Codes:
1 In the Sales module, select Options > Set Up Sales Departments from the navigation pane.
Click thumbnail for larger view of image.
2 Enter a code in the Sales Department box. Sales Department Codes can be up to six letters, numbers, and/or special characters, for example, a sales department’s abbreviation. This code will appear in Lookups and on reports.
3 Enter a description in the Description box, usually the name of the sales department. This description is used to further identify the sales department and also appears in Lookups and on some reports.
4 Enter the general ledger accounts to which sales from this department will post. If the Inventory Sales Account field is left blank, the sales account assigned to the specific inventory item is used when you post. If the Non-Inventory Sales Account field is left blank, the sales account assigned to the specific non-inventory item is used during posting.
For detailed information on the options in this window, see Sales Department Codes window.
5 Select Save to keep the code.
If you use multiple Sales Department Codes for General Ledger and/or reporting, you’ll probably want to include the Sales Department Code field in any of the sales entry window(s) that you use. See Customizing the Sales Entry Window for information on how to include Sales Department Codes in the Sales Order Entry window. Refer to Setting Up Your Registers for instructions on including Sales Department Codes in the Sales POS Register window.
Published date: 11/22/2021