CMS Professional to Denali Conversion Settings
This topic assumes you have completed the steps in Conversion Process. In the CMS Professional to Denali Conversion window, you will define the conversion settings.
NOTE: The steps in this topic only apply to a full conversion. If you are converting payroll data into an existing company using the Organization > Convert Payroll to Denali option in Controller, once you select the CMS Professional company to convert from, the Payroll check box is enabled and checked by default and all other options in the window are disabled. Click the Validate/Convert Data button to convert your payroll data. |
To define conversion settings:
1 In the CMS Professional to Denali Conversion window, select the location of your CMS Professional organization data.
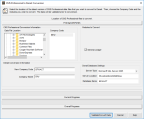
Click thumbnail to view larger image.
2 In the Organization Code box, select the code for your existing CMS Professional organization. Many of the fields and options in this window are disabled until you select your organization code.
3 Depending on your business needs, you can either keep the default settings for the module check boxes, or deselect any module(s) you do not want to convert.
A module check box is active and checked by default if all of the following are true:
• The system detects CMS Professional data for the module (posted or unposted).
• The module is installed for Denali.
• The proper licensing key(s) exists for the module in Denali.
If at least one of these statements is not true, the module appears disabled and/or unchecked and you cannot convert data from it.
If you previously converted a module(s), see Converting a Previously Converted Organization.
If you previously converted a module(s), see Converting a Previously Converted Organization.
4 Enter the Denali conversion information and database settings.You may modify these settings at this time. The settings are:
• New Organization Code: This is a unique six-digit character code used by Denali to distinguish your organization. The selected code appears by default with "ACT" or a three-digit number appended to it. You can edit this code. If you previously converted your organization, see Converting a Previously Converted Organization.
• Organization Name: This field reflects the full name (description) of your organization and auto fills with the Organization Name from the CMS Organization Information window of the CMS Professional program. You can edit this field.
• Server Type: This field shows the SQL server type to which you are connecting.
• Server Location: This field auto fills with the location of the primary server.
• Database Name: This field defaults to the organization code with "ACT" or a three-digit numeric value appended to it. If you previously converted your organization, see Converting a Previously Converted Organization.

Click thumbnail to view larger image.
5 Once the information and settings are complete in the CMS Professional to Denali Conversion window, select the Validate/Convert Data button to begin the process.
After you select this button, the status bars in this window show the stage of the process.The system first validates the existing data to make sure it will properly convert (see Data Validation Outcomes). Then, it converts the existing data into the new Denali database (see Data Conversion Outcomes). The process might take a significant amount of time depending on your hardware and the amount of data you convert.
If at any point in the process a problem is detected that affects the data, an error message appears and you will have the opportunity to view a report. You can also print the report to use to correct the errors before continuing. In some cases, the problem can be automatically corrected by the system as part of the conversion process. Refer to Working with the Conversion Reports for more information on the different conversion reports that might appear. You can also refer to Troubleshooting Options for other information about problems.
6 When the conversion process finishes, a completion message appears that indicates the conversion was successful. Select OK to close the message and the conversion window. The CMS Set Up/Select Organization window appears from which you can select your organization.
Now that you have completed the conversion process, refer to After Converting to Denali before you start working with the program.
Published date: 10/24/2019