Entering Customer Transactions
This includes the steps to enter a basic transaction in Accounts Receivable. If you selected to block charges to past due customers in Module Preferences and you select a customer that is past due on their account, the PAST DUE label will appear to the right of the Customer Name field.
To enter a transaction:
1 In the Accounts Receivable module, select Transaction Tasks > Enter Adjustment / Payment Transactions from the left navigation pane. The Enter Payment/Adjustments window will appear.
2 If you use batch processing and you have not selected a batch to work in, select an existing batch or create a new one.
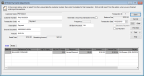
Click thumbnail for larger view of image.
4 In the Customer Number field, type the customer number or use the Lookup to select the customer number for this transaction.
5 In the Transaction Code field, type the Transaction Code for this transaction or select it from the Lookup.
A default description (the description of the Transaction Code you chose) will appear and you can keep it or change it.
Depending on the Transaction Code you selected, different fields will appear in the window. See Entering Payment Transaction Details for information specific to the detail grid.
Published date: 12/31/2020